Life's Sweet Journey: Foodie
Showing posts with label Foodie. Show all posts

Friday, May 18, 2018

Things to Do and Where to Eat in Kanab, Utah

Happy Friday Friends! 

I am sooo behind on sharing, I don't even know what to begin with. We explored Zion, we've visited Grand Canyon National Park, and hit up spots in between. I am working on our national park videos and will have those ready to share soon. Until then, I figured I would share our time in Kanab, Utah! 

We originally went to Kanab with the plan for it to be home base to explore both Zion and Bryce Canyon (which are each about an hour away); however, we quickly discovered that Kanab has a ton of awesomeness of it's own to offer. We ended up sticking close to Kanab for the week we were there, while we waited on a new AC to arrive for Delilah the Dream Machine

Here's a little peek at everything that Kanab has to offer: 
Kanab Utah Where to Eat Things to Do


Cave Exploring 

Kanab has a cave system, right off of Highway 89, that can be explored for free. There is also Moqui Cave, which is a cave turned museum that can be toured for a small fee. We walked into Moqui Cave, but decided not to pay and opted to try for the caves that can be explored on your own. Situated between Moqui Cave and the turn off for Best Friends Animals Sanctuary, you can't miss the outcropping of cave entrances situated about halfway up the cliffs. In order to access them you simply find a pull-off on the side of the ride and take a short trail to the base of the cliffs to make your way up and across. There is no designated spot telling you where to go up. Thanks to advice on the Outbound site, we knew to approach from the far left. Definitely heed this advice! Trying to scale the cliff face would be way too hard. You can get up the cliff easily from the left and then approach the cave entrances from the top. The Kanab caves were awesome! They were far deeper than I expected them to be and we were blown away by how beautiful it was! 

Thursday, January 18, 2018

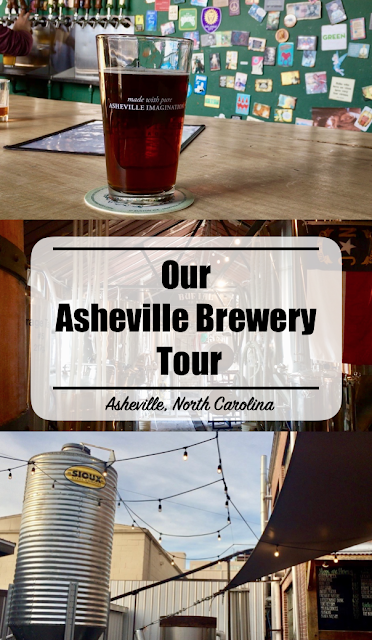
Our Asheville Brewery Tour

Happy Thursday! 
This week it's been all about Asheville here on the blog and we kicked it off with some amazingly yummy food! Today's it is all about the boozy side of Asheville... come join us for our Asheville Brewery Tour! 

Asheville Brewery Tour

Babe and I have birthdays just two days apart, which we actually find pretty fun, because it means double the celebrating! We spent my birthday checking something off my bucket list (seeing the Biltmore at Christmas) and we spent his doing our own Asheville brewery tour . Asheville's brewery scene is hopping (pun intended)! There is practically a brewery on every corner. We chose five that were in pretty good proximity to each other and made a day out of it! 

Monday, January 15, 2018

Biscuit Head || The Best Breakfast {and Lunch} in Asheville, NC

Happy, happy Monday! 
Cheers to a new week!

We are currently set-up at a park in Alabama, visiting a sweet friend of mine who just had a baby! I love that this RV life allows us the freedom to visit for a lot longer than we would have been able to otherwise. 

This week, on the blog, we are sharing all about our time in Asheville! And what better way to kick off exploring somewhere new than with a good meal?! Seriously, y'all! Asheville has some amazing food, but what took the cake for us was Biscuit Head! BEST. BISCUITS. EVER!! 


Biscuit Head the Best Breakfast in Asheville

Biscuit Head has Amazing, Unique Options 

Monday, November 21, 2016

Honey Roasted Pumpkin Seeds

It's that time of year again! 
It's pumpkin seed season!! 

The time of year where I start hoarding pumpkins, asking friends if they will be using the ones they had sitting on their porch steps now that Fall is ending, and seeing if I can make them last into the new year. Last year I was still baking pumpkin seeds in January! This is not an exaggeration! I love me some pumpkin seeds, so I figured I would share my favorite recipe again, for anyone who loves them as much as I do!! 

Ingredients
Olive oil
Honey
Garlic Salt 

I am not a measurer of things, so if you need precise, then I'm really sorry. I kind of just throw in a little of this and a lot of that depending on my feelings in any particular moment. So here is a general overview of my step-by-step process... 

Step 1) Start by preheating the oven to 350 degrees. 
Step 2) Cut open pumpkin and scoop out seeds. Then place all the seeds in a bowl of semi-warm water. I let the seeds soak for a minute or two and swoosh them around the get the stringy pulp separated. The pulp should settle to the bottom and then I fish the clean seeds out and place them on a paper towel. I like my seeds to be cleaned (no thick pulp), but not too clean (still a little orange film), because I think it adds more of that pumpkin seed yumminess when finished.  
Step 3) Pat the seeds dry with a paper towel. I will usually do this twice, transferring the seeds from the first paper towel to a second in between patting (that way the seeds aren't sitting on a wet paper towel). The new paper towel will help to soak up some of the extra moisture, but I don't ever wait for the seeds to dry. Some people will tell you that's a thing (and that you must wait), but I am too impatient to have that be one of my things, so they are still moist when I stick them onto their baking sheet and this method hasn't failed me yet! I prep the baking sheet with aluminum foil and a sprinkle of olive oil (makes cleanup a cinch).
Step 4) Place the seeds in a plastic bag and pour in just a tad of olive oil, quiet a good squeeze of honey and about two shakes of garlic salt. I close the bag and get to shaking. I shake (and knead) until all the seeds are coated, check to make sure I feel they are evenly coated (if not, or I just feel in the mood for more, I will add a dash more salt and honey) and then spread them evenly onto a foil lined baking sheet. *Note: You could mix in a bowl, I just find the bag helps to spread the honey and salt evenly and makes cleanup a lot easier!
Step 5) After making sure they are evenly spread (not a lot of seeds overlapping) I will sprinkle more garlic salt on top so that the seeds have an even coating of salt. Then for good measure, I squeeze just a bit more honey to give it a good pop and then place the pan in the oven. 
Step 6) Bake for 12 minutes and then take the pan out and flip the seeds. Pop back in oven for another 12-15 minutes or until golden brown (or crisped to your preference). Babe prefers his seeds a little more crispy so sometimes I will leave them in a little longer for him. Just watch carefully, they can go from brown to burnt real quick! 
Step 7) Voila! Just let cool and enjoy!! 
  
How seeds look going in... 
How seeds look coming out! 
Pumpkin seeds are one of my favorite fall snacks! 
Happy munching!! 
How do you prepare yours? Any other sweet and salty recipes I should try?

Wednesday, June 1, 2016

BLUEtiful and Easy Blueberry Cobbler!

Because blueberry picking season is at an end yet again, I felt it was only right to commiserate, by sharing some blueberry goodness I still have to look forward to. I had posted this recipe a few years ago and now I will share it again, in all its BLUEtiful splendor! Enjoy!! 
~~~~~~~~~~~~~~~~~~~~~~~~~~~~~~~~~~~~~~~~~~~~~~~~~~~~~~~~~~~~~~~~~~~~~~
Friends, let me tell you. I have never really been a huge blueberry fan, not since getting sick off of a blueberry muffin my freshman year of high school. That is all a thing of the past!! I am a blueberry freak and this morning finds me lusting after fresh, juicy, ripe, off-the-vine blueberries! Babe and I went by a blueberry farm that a friend and I heard about while picking at a strawberry farm. Well, it was AHHMAZING! 
Acres and acres of endless berries... and they even had honey bees!! I got as close as Babe would let me (dude kinda freaked a little). I was in blueberry heaven!! And after eating blueberries straight from the vine, and being able to be very selective as to the berries I put in my basket, this girl will never be able to buy another thing of blueberries at the store. Alas, blueberry picking season is now over. My little heart is crying! Blue tears! But in the meantime, I will simply dream on that last little bit of blueberry goodness and share with you this recipe that my mom makes every 4th of July! It was the only way I could ever eat blueberries for a while. And it is one of the most delicious things you will ever eat!! 
Apparently it was Gooding's recipe before mom had it, but for the sake of my memories we will call it...

Mama F's Blueberry Cobbler!!
 After acquiring all of the above ingredients {and setting the oven to preheat at 350} the steps go as follows...
1.) Line the bottom of your pan with blueberries and cover with lemon juice. Mom typically uses one large 13X9 pan, but because I was baking with the kiddos I nanny for we used two 8in pans. I had to be able to take one with me!!
2.) In mixing bowl combine flour, sugar and baking powder with your one beaten egg. Use a fork (or your clean hands) to mash all of this together! I like mine pretty crumblie so that it spreads nicely, but that is all up to preference. Really it just needs to be mixed so that there is no remaining flour/ sugar not mixed in. **side note- I usually like to add just a tad more flour and sugar (they just need to be equal parts) because the crust is yummmtastic!!
3.) Spread flour/sugar mixture over blueberries. It may not spread over completely as it will settle between berries. **I make more crust because I like mine pretty well covered!
4.) Pour melted butter over crust!
5.) Sprinkle cinnamon and light brown sugar over crust! **Feel free to use a dosh more of this then recipe calls for; I did!

6.) Bake at 350 for 35-40 minutes or until you notice the top is starting to turn crisp and brown! *Bake time will be shorter for convection ovens. And of course it never hurts to open the oven up to take a whiff and a peek! Amp up the anticipation!!
 7.) Enjoy! So good we had to dig into that puppy before we even got the camera out!!
Yummm!! Blueberry Beauty!!
 *** This is a great recipe to make with kids! The little girl I nanny for requested a baking day and this was perfect! It allowed her to be hands on with every step. I basically just supervised and snapped pictures while her sweet heart baked the afternoon (or 15 minutes at least) away! I love afternoons with her!

Thursday, May 5, 2016

{Giveaway} My Favorite Camping Happies!!

Happy Thursday Y'all!! 
Friday is so close I can almost smell it!!

But, until it gets here, I figured it was time to share a little happiness with all of you! 
In honor of all things camping, this weekend's upcoming Flo adventure for our 6 year wedding anniversary and the fact that the destination is unknown (to me anyways)- and because who really even needs a reason to share happiness anyways- I am partnering with some awesome companies to share some of my favorite FloRida-trip-happies with you! 
When we go RVing there are a few essentials we always take with us, for one reason or another. Most of these essentials also seem to translate over into our "docked" (at home) life too; so, whether you are out adventuring, snuggled up at home or trying to make it through a busy day these are all pretty good things to have around!!

But for us, here are the main reasons we keep them on-hand...
Jerky- Jerky is the perfect snack for long hikes as it keeps us fueled and ready to go, but it's also perfect for a mid-morning work snack! Field Trip Jerky is seriously the best stuff around!! With no preservatives or added MSG this stuff is so fresh and good and has that "just-right-jerk" texture that I look for in a good jerky! The first time we tried this stuff we were floored in comparison to the typical stuff we used to get. 
Popcorn- If you have followed me for a while you know how much I love my popcorn!! Seriously, I can't make it through the week without at least one popcorn-for-dinner night! That translates over into our travels too and we usually have one popcorn night while we are in Flo. And the best, and really only true way to enjoy popcorn is stove top popped! If you don't have a Whirley Pop, get one!! I swear by mine (and never washing it out)! Then you can pop these yummy Jolly Time popcorn kernels anytime! Another popcorn trick I love: cutting open a back of microwave popcorn, with the butter and oil all mixed in, and popping that over the stove (or campfire)!!
Honey- Y'all!! Honey and cheese night (and of course a good bottle of wine) is Flo's specialty! Without fail, cheese and honey night happens every, single night! And if you have never tried honey on your cheese before you are missing out on a whole segment of life! Try it! And I recommend starting with Savannah Bee Company's whipped honey! I love the thickness of the whipped honey when paired with cheese! My favorite pairing? A good havarti or Vermont sharp cheddar! 
Cards- Because cheese and honey night should best be enjoyed over a game of rummy!! Our game has been going on over 2 years now. I am currently in the lead (for a while now), but Babe is slowly creeping back into the game! Current score: Me- 10,310 Babe-10,100
Adventure Mug- Every morning needs a little 'Adventure Fuel' happiness to kick-start the day!!
Coffee- Because the mug just isn't complete without the coffee to go in it! I know Seattle's Best is just your run-of-the-mill, grocery-store-shelf-find, but I love the taste. It's strong without being bitter, goes done smooth and soothes my soul! Even better, sweeten it with a little bit of that honey and you have what I call "coffee-bliss"!! 


One "happy camper" will win all of this great goodness! 
It includes: 12 bags of Field Trip Jerky + a super comfy American Apparel Field Trip Jerky shirt, two bags of Jolly Time popcorn kernels, travel pack of Savannah Bee Company's whipped honey in different flavors, a pack of Bicycle cards, an Adventure Fuel mug and a bag of Seattle's Best Coffee! 

Happy Entering! 
Entry options below image! 

a Rafflecopter giveaway

Friday, January 22, 2016

Strawberries 5 Ways: 5 Favorite Strawberry Recipes!

I love Florida! Oh so much! Yay for strawberry season!!
I was so excited to see that Brook Hollow Farm would be starting their season early this year. They are a hydroponic farm in Orlando and I LOVE them. I love not having to bend down to pick berries!! The farm is run by the sweetest couple, who live on property. While the majority of their farm is geared towards strawberries, they will also have blackberries and tomatoes soon! They make my heart (and belly) very happy! If you live in the Orlando area, you have to check them out!

Needless to say, I have been strawberry happy over here!! So I thought I would share with you some of my favorite ways to enjoy their red and juicy goodness!
Fresh!~ I mean this needs no explanation! Fresh strawberries each morning are bliss! Right off the plant? Even better!!

Smoothies!~ I always freeze a good handful or two so that I can keep them for smoothies!! My favorite is banana and strawberry with a hint of tangerine. I do the following...
1 half frozen banana
1 half fresh banana
3 frozen strawberries
1 half of a vanilla Greek yogurt
about 3/4 cup almond milk (add more or less for desired consistency)
1 drop of tangerine oil (smoothie must be in glass cup if oil is used)

Honey Mustard Tilapia with Strawberry salsa!~ This dish has been a favorite of mine for a while. I had found a similar recipe along time ago in a cookbook I had checked out from the library and tweaked it to create one more my style. Here's the recipe:
For fish baste-
2 small/medium tilapia filets 
3 or 4+ tablespoons honey
1 small squeeze yellow mustard (could change mustard based on taste preference)
Garlic Salt 
Season all Salt 
Preheat Oven to 420. Line pan with aluminum foil and coat with a bit of oil. Place fish on pan and season both sides with garlic and season all salt. In a small bowl mix honey and mustard together. I do a tiny squeeze of mustard because I prefer mine more of a honey base, but Babe like mustard so once I have basted my fish I will add a larger squeeze of mustard to baste his. Make sure to coat both sides of fish. I will also add a little pepper to his fish. It's great because you can really play to taste preference. Once preheated bake fish for 5-6 minutes on one side, then flip and bake for another 5-6 minutes. 
Salsa-
Handful of strawberries cut up
Pineapple chunks
Lime juice
1 tablespoon honey
While fish is cooking mix strawberries, pineapple, a few drops of lime juice and 1 tablespoon honey in a small bowl. Put in fridge until fish is done. Once the fish is cooked, top with salsa. I usually serve over/ with rice. I know you might be thinking, fruit and fish?! But oh my, is it delicious!! When in season I will also use kiwi or peach in the salsa.

Strawberry, PB & N Flatwich~ I discovered this delectable treat one afternoon while making Nutella sandwiches for the kids I nanny. You simply take the FlatOut pita wraps, swipe some peanut butter on one side and Nutella on the other and then slice strawberries and spread them across the middle and then fold in half. This is my favorite hiking day snack, because unlike a meat sandwich, the warmer the sandwich gets the better it is!! When I am eating it at home I will often put in the microwave for a few seconds (between 9-12). It makes the perfect little treat or a sweeter lunch! Great option for picky kiddos too!


Strawberry Water~ I have the hardest time remembering to drink enough water during the day, but when I have strawberries in the house it makes it A LOT easier!! I love strawberry water! Just cut the top off a fresh berry and plop it in the water! Keeps me refilling that water all day! Yay for hydration! To vary it up every so often I will add cucumber or blueberry with the strawberries. I also love to plop in a drop of grapefruit oil too to give my metabolism a boost (always use a glass bottle when adding essential oils)!


Strawberries make me happy and I can't wait to get back to the farm!
Happy strawberry season friend!! 
It's FRIDAY!! 


Wednesday, November 11, 2015

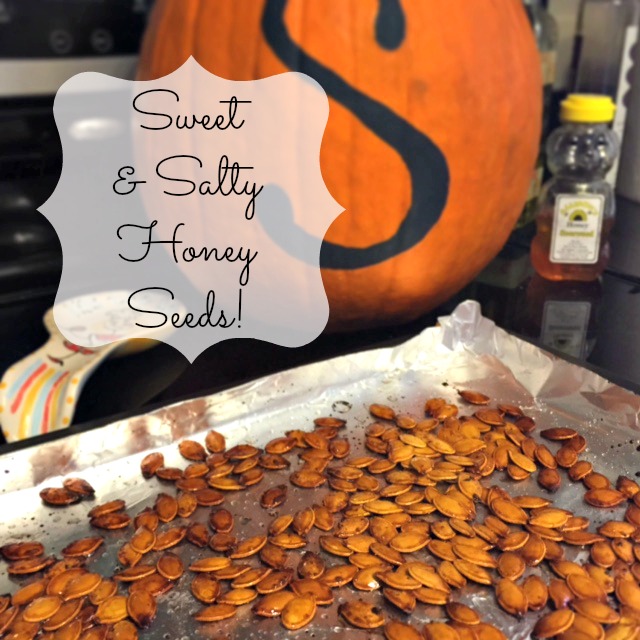
Sweet and Salty Honey Roasted Pumpkin Seeds

Pumpkin seeds! Pumpkin seeds! Pumpkin seeds!! 
I have a love affair with pumpkin seeds! I waited as long as I could this year, but it was finally time to crack our pumpkin open and get scooping! Every year I make the same seeds. I always say I am going to try others, but I like what I like. And so this year it was another round of...
Sweet and Salty Honey Seeds! 
As if I could have done anything else right?! As a lover of all things honey, these are the perfect seeds for my soul! And they are super easy too! Just three ingredients and a little over 30 minutes between prep and bake and you have yourself a tasty snack! 

Ingredients
Olive oil
Honey
Garlic Salt 

I am not a measurer of things, so if you need precise, then I'm really sorry. I kind of just throw in a little of this and a lot of that depending on my feelings in any particular moment. So this time the step by step looked a little like this...

Step 1) Start by preheating the oven to 350 degrees. 
Step 2) Open and scoop out the pumpkin. I cut the top so that I take a large chunk out of the back. It leaves more room for me to scoop without getting overly yucky while still leaving the front nice and pretty so that I can put the lid back on and pumpkin back outside once finished. I then place all the seeds in a metal bowl of semi-warm water. I let the seeds soak for a minute or two and swoosh them around the get the stringy pulp separated. The pulp should settle to the bottom and then I fish the clean seeds out and place them on a paper towel.I like my seeds to be cleaned (no thick pulp), but not too clean (still a little orange film) because I think it add more of that pumpkin seed yumminess when finished.  
Step 3) I pat the seeds dry with a paper towel. I will usually do this twice, transferring the seeds from the first paper towel to a second in between patting (that way the seeds aren't sitting on a wet paper towel). The new paper towel will help to soak up some of the extra moisture, but I don't ever wait for the seeds to dry. I know some people will tell you that's a thing (and that you must wait), but I am too impatient to have that be one of my things, so they are still moist when I stick them onto their baking sheet (this method hasn't failed me yet). I prep the baking sheet with aluminum foil and a sprinkle of olive oil (makes cleanup a cinch).
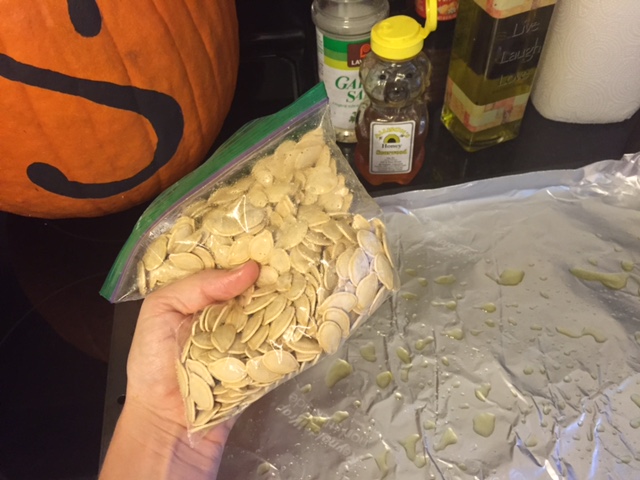
Step 4) Place the seeds in a plastic bag and pour in just a tad of olive oil, quiet a good squeeze of honey and about two shakes of garlic salt. I close the bag and get to shaking. I shake (and knead) until all the seeds are coated, check to make sure I feel they are evenly coated (if not, or I just feel in the mood for more, I will add a dash more salt and honey) and then spread them evenly onto a foil lined baking sheet. *Note: You could mix in a bowl, I just find the bag helps to spread the honey and salt evenly and makes cleanup a lot easier!
Step 5) After making sure they are evenly spread (not a lot of seeds overlapping) I will sprinkle more garlic salt on top so that the seeds have an even coating of salt. Then for good measure, I squeeze just a bit more honey to give it a good pop and then place the pan in the oven. 
Step 6) Bake for 12 minutes and then take the pan out and flip the seeds. Pop back in oven for another 12-15 minutes or until golden brown (or crisped to your preference). Babe prefers his seeds a little more crispy so sometimes I will leave them in a little longer for him. Just watch carefully, they can go from brown to burnt real quick! 
Step 7) Voila! Just let cool and enjoy!! 
  
How seeds look going in... 
How seeds look coming out! 
Pumpkin seeds are one of my favorite fall snacks! 
How do you prepare yours? Any other sweet and salty recipes I should try?

Friday, October 30, 2015

#flasbackFriday: Epcot Food & Wine Favorites

Sharing a little #flashbackFriday on the blog today! I first posted this almost a year ago today and thought that it was time to bring it out of the archives. With just over 2 weeks left to enjoy Food and Wine at Epcot I thought it would be a good time to shine some light on some favorites! That and I am missing Disney like crazy!! Enjoy peeking at (and hopefully eating soon) food around the world!! (post first published November 2014) 

I used to despise Epcot. I would beg my grandparent's not to take me there as a kid. "Please, pleeeaaase, take me to Disney instead?! Please!" As a young child Disney only meant one thing, Magic Kingdom. As I emerged into teenagehood and then into my early adult years, it broadened to MGM Hollywood Studios and then Animal Kingdom. But never, ever Epcot. And then our year of Disney living began and my world was opened to the wonderfulness that is the World Showcase... especially during 'Flower and Garden' and 'Food and Wine'. My poor Mimi, she just wanted to try to teach me the wonders of it at an early age. Apparently, I wasn't having it though. So when I said to Babe, "I love Epcot, it is my new favorite park!" And he responded in kind, I had to follow it with, "We are becoming my grandparents." And I am more than fine with that. Though it is doubtful, maybe I will have better luck convincing my grandchildren that Epcot is a glorious place. Kids?! Let your grandparents take you to Epcot!! I wish I had spent more time there with mine.
The necessities of the "Food and Wine Investigator"= sunnies for before the sun dips down, the Food and Wine Passport, a pin for jotting notes and the phone (my ever present companion)
While I doubt we will obtain our goal of trying every food item at Food & Wine, we are well on our way there. I loved playing Food and Wine investigator and apparently played the part as it was joked that I made quite the investigative reporter with outfit to match and so this shot was snapped. So, now that I have had the immense satisfaction of exploring the World Showcase and attending Food and Wine, who knows how many time in the last few weeks, here is a sampling of my Food and Wine recommendations: 
Our documented passport... A smiley face= well liked, marked GIMB!!= Get in My Belly!, not good= ick, and others received general notes (i.e. Canada, which we found just alright, though I really enjoyed the fish)
My Top 5 Five Food and Wine Treats
1.) Kalua Pork Slider in Hawaii- This was so yummy and takes the top spot for my favorite hearty food item. 
2.) Beijing Roasted Duck in China- I am waiting to go back and get the whole one to myself. A friend got this the night we went with a group and I tried a bite. So yum!! 
3.) Grilled Lamb Chop in Australia- I would have eaten the bone if it wouldn't have broken my teeth! I couldn't get enough of it and it's a good size portion for one person. 
4.) La Passion Martini Slush in France- I am not much of a beverage person, I prefer the food, but this was my favorite drink and I would get it again. 
5.) Seared Sea Scallop in Scotland- I am not a scallop person, but this was quite delectable and a favorite of everyone in our group. To quote: "That one needs a smiley face!! Do it!! Put a smiley face!" 

Those 5 above all received a smiley face, but the overall winners of our Food and Wine experience, receiving the only two GIMBs (Get in My Belly) so far were... 
Croissant Doughnut (my choice) at the Refreshment Port 
and the Lamb Meatball (Babe's Choice) in New Zealand

The only item to aquire an ick rating has been the Pineapple wine in Hawaii, I guess everything can't be amazing right?! Also, while honey and cheese would typically be a favorite of mine the cheese in Greece was just a little too much for me; too cheesy, which I didn't think was possible. Not cheesy enough for an 'ick', but I didn't eat the whole thing, way too rich. 

With the final weekend of Food & Wine looming ahead of us I hope that you find time to do some investigating of your own before it comes to a close for the year. We plan to try to check off a few more items on Sunday and Monday. Any recommendations? Anything we must try?! 

Our top 5 want to try items:
Mussels in New Zealand
Pavlova in Australia 
Salmon in Patagonia
Bobotie in Africa
Mahi in Singapore 
Fisherman's Pie in Ireland

Linking up with the 5 on Friday gals! 

I figured in honor of my first #flashbackFriday post, why don't we all peek through the blog archives and pull out a post we would all enjoy some love on. 
Link up any old post that you want to share that is at least over a month old!
Limit links to two posts please. 
Happy #flashbackFriday!!

Wednesday, October 28, 2015

Missing the Magic! Favorite Magic Kingdom Food for Less

Oh my goodness, have I been missing Disney!! With Food and Wine going on I am so sad that we don't have passes anymore. We had our "Year-O-Disney" and it was time for a change up, so we got Flo (who I dearly love!), but oh, I am missing the magic and the wonder... and the FOOD!! 
So, since I am sitting here hungry and salivating I figured it was as good a time as any to share our favorite places to eat for cheap around the Kingdom!! As a couple we were always on the hunt for foods that would be filling and yummy, but also shareable! It really helps on the Disney pocketbook! I am not sure how well this would work if you had kiddos, but for us these sharing was our fail safe way to save a few pennies on food at the Magic Kingdom. Here are the spots we found that works best at, while still getting delicious food...

Golden Oak Outpost Fry Cart!! 
Oh my gosh and goodness!! These loaded fries are by far our favorites! Sadly, we didn't discover then until late in our Disney game. We tried to go back to the Magic Kingdom as often as we could as our passes were ending, sometimes just so we could have these yummies. They are also totally man approved, as they were always what Babe would request for lunch. Golden Oak used to only be open for lunch, but we have heard that they stay open later now! We would often share one to tide us over until we got a bigger dinner, but if we wanted to go all out they are still not bad at just around $8 per person! Definitely worth the cost and calories!! We loved them all, but my favorite was the BLT!! 

Gaston's Tavern Roasted Pork Shank!!
This is the perfect meal to split, making the cost right at $5 per person. It is so good and so juicy and also huge! Between the two of us we could barely finish, but don't worry we managed!! And though it does add a little bit to the cost, it is also really hard to pass up the warm cinnamon roll. So gooey and good and perfect for sharing with multiple people ($5 for the roll). We would usually do this option for dinner and sit outside after the sun had gone down to enjoy a little break before hitting Fantasyland! 

Cosmic Ray's Cheeseburger!!
Our favorite spot to grab a burger used to be Pecos Bill Tall Tale Cafe, we enjoyed the atmosphere better and would make it our "go-to spot" before hitting my personal favorite, Splash Mountain. However, Peco Bill now serves tex-mex, which we will have to go back and try, but haven't made it since they changed. However, Cosmic Ray's offers similar burger options. We would usually split the burger (huge) and fries. We would load up our half of the burger to our liking at the free condiment bar (onions, mushrooms, all the fixings) and chow down. This would usually be a lunch option before a bigger dinner and comes out to about $8 per person. While probably our least favorite of all these options this would be a quick and easy go to and sometimes, well, you just want a burger after a long morning trekking around the park. 

Columbia Harbor House Seafood Mac and Cheese!!
Cheese, glorious cheese!! I love me some mac and cheese!! Add in lobster and I am in heaven!! Seriously, this stuff makes me happy and while it isn't super Babe approved (he is not a mac and cheese fan), he still enjoys it too. It is also really rich, which to us makes it super filling, so we can share one no problem. It may look smaller, but trust me, it hits the spot perfectly for two people! It is a little more expensive than the others, coming out at about $7 per person if you are splitting, but I mean lobster!! Lobster and cheese and happiness for $7? It can't be beat! We would eat it, sit a minute and then hit the Haunted Mansion for a slow, easy ride while the cheese digested!! 

I realize that these are all share options, but coming from two people who love their food (and one who will get real hangry if she doesn't eat enough), you definitely get enough to satisfy! 

And for those of you looking to explore Epcot and The Food and Wine options, here are some of my favorites dines from last year! Oh, miss it! I miss it!! 

Have a gloriously, magical day!
Any tips or tricks of your own for saving on food at the park? 
Share in the comments, I would love to know your secrets!